
In the next article we are going to take a look at Papis. This is a useful tool for research scholars. This application is a powerful and highly extensible bibliography and document manager command line based. It is a free, open source, command line tool. Its code is available together with its characteristics in the GitHub page of the project.
Papis is not only for a particular research community but also it will be useful who seeks to manage their documents easily and effectively. In addition, we will be able to retain full ownership of the data, as all data will be stored on our local drive.
We can use this tool to sync our documents using git, dropbox, rsync, OwnCloud, Google Drive, etc. No registration required or account on any library sharing website.
We will be able download documents from Sci-Hub and add them to our library with all the relevant information in seconds.
We will have the possibility of create custom scripts or use existing scripts provided by Papis to help us accomplish great tasks with ease. For example, you can use the papis-mail script to send our documents.
Installing Papis on Ubuntu 17.10
Installing Papis is not that difficult. The easiest method to install it is use PIP. We will only have to execute the following command in the same terminal to install Papis:
sudo pip3 install papis
There are other installation methods available if you don't want to use pip3. You can check the official installation page for more details.
Basic use
Using Papis is not particularly difficult either, however, if we will need a basic knowledge of the command line.
Add documents to the Library
I have a couple of pdf documents on my local disk available for this example. For add a document to your library (which will be created automatically), run:

papis add entreunosyceros.pdf --author "SapoClay" --title "entreunosYceros" --confirm
As you can see in the example above, a PDF document has been added called «entreunosYceros». I have also used three indicators: «–Author", «–Title" Y «–Confirm«.
The indicator «--Author»Will make dads use«TopoClay»As the author's name. The indicator «–Title»Will tell Daddies to use "entreunosYceros". The last indicator, «–Confirm»Will instruct Papis to request confirmation before adding the document to the library. You can omit the indicator «–Confim»If you don't want parents to ask for confirmation before adding a document. We can see all the available indicators using the "add" option and the help indicator, as shown below:
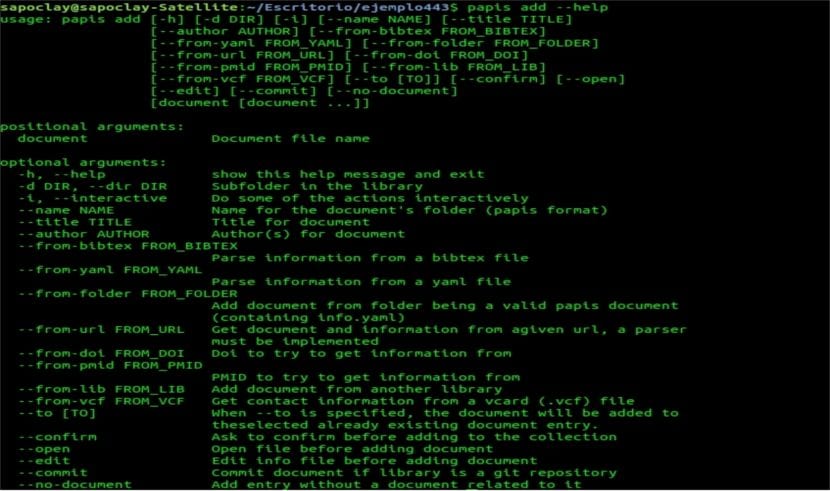
papis add --help
All documents will be stored in the library folder ~ / Documents / papers / default.

Also, here we can find a file called «info.yaml»Containing details of the newly added document.
Opening a document
After adding all the documents, run the following command to open the added documents.
papis open
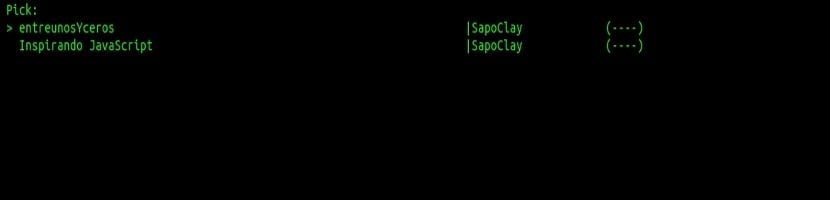
If you only have one document in your library, the above command will automatically open the file in its respective file viewer. The pdfs will open in the default viwer pdf, for example.
If there is more than one document in the library, we can use the UP / DOWN arrows to choose a document and press the ENTER key to open it.
List of documents

For list all files available in library, we will execute in the terminal:
papis list
Create a new library
As I already mentioned, everyone documents will be added to library folder ~ / Documents / papers / by default. This can be changed.
To do so, edit the file ~ / .config / daddies / config:
vi ~/.config/papis/config
In the file change the path of the library folder. Here is the content of the default configuration file.
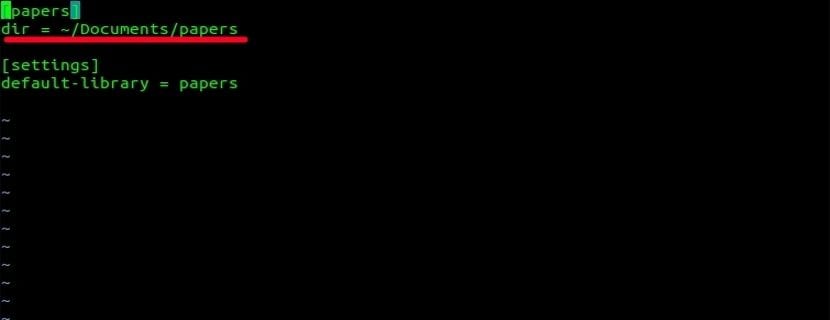
We will be able to change the path of the default library folder or create new libraries for each category. For example, if we wanted to add videos, we would have to add the following directive in our configuration file.
[videos]
dir = ~/Documents/videos
Get help
This is just a basic guide from Papis. I would not say that it is a complete guide, but it is enough to start using this tool. To obtain more details about the use of Papis, we can make use of the help section by executing the following command:
papis -h
Also whoever needs it can refer to the help section for individual commands. For example, if you want to know more about the "list" command, just run:
papis list -h
If anyone needs more help with this program, they can always turn to la Official guide detailed that covers all aspects of Papis.