
If I remember correctly, Linus Torvalds said something like "what Ubuntu did so well was make Debian usable." I think that everything has changed a lot over the years, but there are still things in Debian that could be easier, such as creating a USB Bootable with the operating system. Ubuntu and many other distributions can create a Bootable USB with the disk tool that they carry under their arm, but this is not the case in Debian. Yes you can, and in this article we will teach you how to put Debian 10 "Buster" on a USB.
Debian 10 was released just over two weeks ago. Among the most outstanding novelties of the new version we have updated versions of the graphical environments, that AppArmor is now installed and activated by default or that support for UEFI has been improved. I think that more than one would like to see in the list of news a tool to create bootable disks and / or a USB to be able to run Live Sessions, but right now the best way to do it is from the terminal.
Debian 10 + Terminal = USB Bootable
Before we start, we have to make sure we have what it takes:
- A USB stick of at least 1GB. I would recommend 4GB.
- A computer with a version of Linux installed.
- A Debian 10 "Buster" ISO image. We can find the images in this link. In this example we are going to use the iso netinst for 64 bit pc.
Our Process
The nice thing about creating the USB Bootable with the terminal is that you don't need to install extra software. All you have to do is follow these steps:
- We put the pendrive in a USB port. Many Linux distributions mount the drives right out of the box. If this is not the case, they will have to be mounted. In Kubuntu, just open Dolphin and double-click on the new drive that appears.
- We find out the name of the pendrive with the tool lsblk. What we will see will not be the same in all the Linux distributions that we use. In some you can see, in addition to the labels of the partitions, the brand of the pendrive. What you can always see and help a lot is the size of the unit. The output in Kubuntu looks something like this:
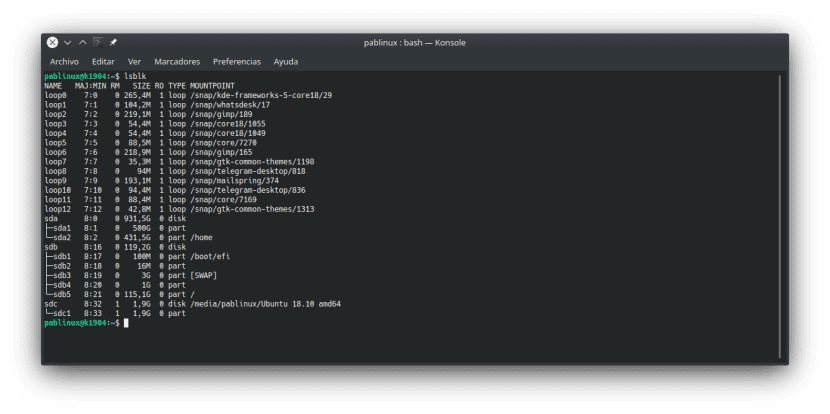
- In this example, my pendrive is "sdc1", so what we are looking for is / Dev / sdc1. In this step we have to check that the unit is not mounted with this command (taking into account that you have to change "sdc1" to your unit):
sudo umount /dev/sdc1
- Next, we have to create the USB with the following command:
sudo dd bs=4M if=/RUTA/A/debian-10.0.0-amd64-netinst.iso of=/dev/sdc status=progress oflag=sync
- In the above command, it is important to note that there are two changes to be made:
- "/PATH/A/debian-10.0.0-amd64-netinst.iso" should be the path where you have saved the Debian 10 ISO that you downloaded / had before starting the installation process. Perhaps, the best way to avoid mistakes is to drag the ISO to the terminal window.
- "Sdc" should be the mount point of your pendrive. You have to remove the unit number, in my case "1".
- The last step is to wait for the process to finish, something that we will know when the status bar has reached 100%. Once finished we can run Debian 10 from our newly created USB Bootable in a Live Session or install the operating system. As you know, all changes made during the session will be destroyed when closing it.
And that would be all. On my new laptop, I prefer to run Live Sessions in GNOME Boxes because it saves me from creating the USB Bootable, but not all computers have the resources to run smoothly. On the other hand, we always have to bear in mind that a Live Session is not exactly the same as a real installation: there are some restrictions, as in the case of Ubuntu repositories, that only the "Main" repository is enabled by default. If we want to use others like "Universe", we will have to perform the manual installation / activation of it.
Are you one of those who will help this little tutorial?
Hello good! This method of creating must love, will it also work for deepi for example?
regards
Thankful for the tip !! you passed it served me a lot !!!
Thank you, you saved my life 🙂
Tried. It does not work.
Thank you! You really helped me a lot, I use Ubuntu 20.04 on my main laptop, but I wanted to install debian on another pc and to surprise the Ubuntu boot disk creator was not able to detect the debian 11 iso, I tried this solution and it worked!