
There are many options for editing images in Ubuntu, but I personally don't like most of them. If I want to resize an image, I don't want to wait how long it takes for GIMP to open. We can always install nautilus-image-converter to rotate and rotate images with the right button from Nautilus but, why install a package, which does not show the text well above, if we have installed one by default that does? In this article we will teach you how to edit, convert, resize and some more things the images from Ubuntu Terminal.
Best of all, what we are going to explain in this guide can be applied to several images at the same time. For example, if we want to rename 10 photos without having to right click, choose "Rename" and put the name 10 times, we can do it using Imagemagick, Ubuntu's default image viewer and other distributions, including Ubuntu MATE, my favorite. Below you have several example commands to perform several of these operations taking advantage of the Ubuntu Bash.
ImageMagick comes installed in many distributions, such as the aforementioned Ubuntu or Ubuntu MATE. If your distro doesn't have it installed by default, you can install it by opening a Terminal and typing the following command:
sudo apt-get install imagemagick
Rename images
If, for example, you make a tutorial of many captures, they will have a name that has nothing to do with what we want to show. Thanks to ImageMagick we can rename them from the terminal with a very simple command. As you will see later, we can change the format of the images and we will use exactly the same command, but appropriate to our task. It would be as follows:
convert *.png prueba.png
By keeping the extension and adding an output word, what you will do is save them all with the same name, but with a different number.
Resize images
Almost all editions of this guide use the key convert. To resize images with ImageMagick from the Terminal we will write the following command, where «test» will be the name of the image that we want to convert to another format:
convert prueba.png -resize 200×100 prueba.png
With the previous command we will have resized an image at a size of 200 × 100 pixels. The first value is the width and the second is the height. If we use the same name, the resulting image will replace the original. If we only want to change the width and the height to be proportional, we will write the following command, where 200 would be the chosen size in pixels:
convert prueba.png -resize 200 prueba.png
If we want it to be 200 pixels high, we would have to leave empty the first value ("Empty" x100), so we would write the following command:
convert prueba.png -resize x100 prueba.png
Sometimes the exact values, but if we want it to be so, we can write the following command, where 200 × 100 would be the chosen size:
convert prueba.png -resize 200×100! prueba.png
Rotate images
If what we want is rotate images, we can do it with the following command, where 90 would be the degrees of inclination:
convert prueba.jpg -rotate 90 prueba-rotado.jpg
It will add the text that we configure in the output file, as long as we write it in a different way.
Edit the image format
ImageMagick also allows us convert images to another format directly from the Terminal. We would do it with the following command:
convert prueba.png prueba.jpg
If what we want is only lower the quality To send the images by mail, for example, we would write the following command, where the number is the percentage of quality:
convert prueba.png -quality 95 prueba.jpg
Combine operations
If we want to make different modifications of this type to an image, we can do it by combining operations. Below you have an example to resize, rotate 180º and lower the quality of an image to 95%.
convert prueba.png -resize 400×400 -rotate 180 -quality 95 prueba.jpg
Processed with the Bash
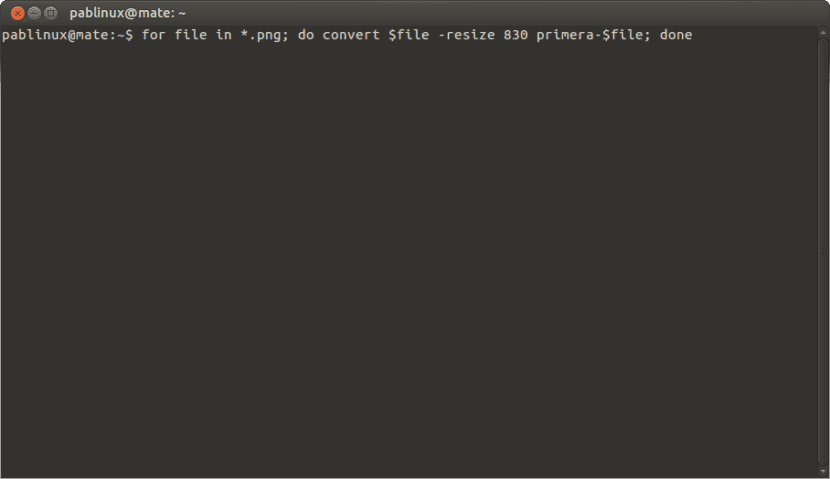
But what I like the most is this, edit many images at the same time. Before editing multiple images, it is worth putting them all in the same folder. I usually leave them on the desktop, so first I type the command:
cd /home/pablinux/Escritorio
Once inside the folder, we write the following command to resize all the .png images in the Desktop folder to 830 pixels wide and add the word "first" in front of it:
for file in *.png; do convert $file -resize 830 primera-$file; done
Basically, what we say is «all files that are inside this folder and have .png format; convert from resize to 830 width and add first- to the file name; finish«. If you edit a lot of images, it may be worth it for you. What is your opinion?
BEST IMPOSSIBLE!
Although I had a notion about the "convert" tool I THOUGHT it was a "native" Ubuntu command, now today I have learned that it is part of ImageMagick.
My congratulations on the article, simple, straight to the point and well written for a quick understanding, even the bash sneaks in without much complication!
Thank you.
Hi jimmy. Thanks for your comment. You can still do more things, like apply effects, but I really think that it is not worth using the Terminal for that. If we have to apply effects, it is best to open the images and see what we do, or so I think.
A greeting.
Thank you pablo. It is something to consider at any given time.