
The best way to test an operating system without compromising any data on your computer is to do it with a Live USB. A Live USB is a pendrive that contains an operating system and everything necessary to install it on another unit, usually on a hard drive. The problem with this is that every time we start it we start from scratch. How can we avoid this? Creating a Live USB that also has persistent storage.
The first thing I want to say is that you have to be clear about the difference between a normal Live USB and a persistent one. Or more than the difference, explain that a normal Live USB (not persistent) also has its positive side: we can break everything we want that is not saved and when we start everything will be perfect again. The problem is that not everything is possible on a normal Live USB. If what you want is a almost real operating system that runs from a pendrive, we will have to do it as follows.
This Live USB will remember all the changes we make
Requirements
- Computer where we will do everything.
- A pendrive in which we will create a normal Live USB.
- A second pendrive that is the one that we will convert into a persistent Live USB.
- Internet connection (to install the software).
- A few minutes.
Our Process
Below I explain the whole process thinking that we do not have anything we need:
- The first thing we will do is download the operating system that we want to install. If the system that we want as persistent is another, we will have to download the other operating system as well. Here we will talk about the fact that we are going to install Ubuntu Persistent from Ubuntu Live, both on USB.
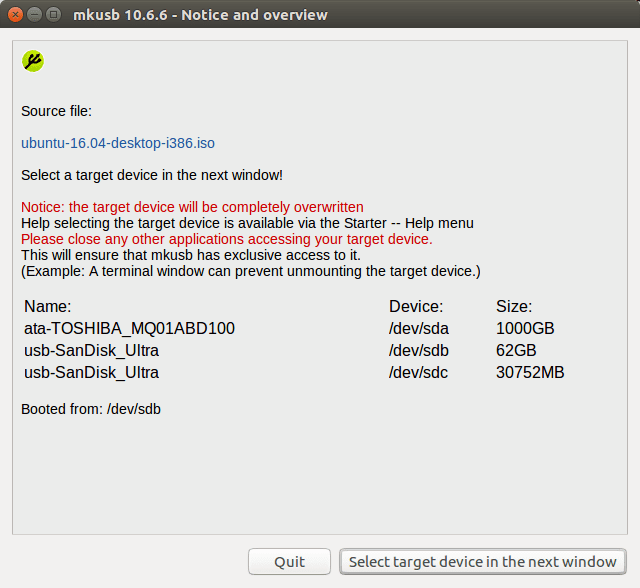
- Once the operating system has been downloaded, we open the "Boot Disk Creator" tool.
- We create the Live USB from which we will install the persistent one. For this we select the ISO image (source) and the usb where we will install it. We accept and wait. In this article you have more details.
- Next, we turn off the computer and start from the usb.
- It goes without saying that we have to go to the network settings and connect to WiFi if we are not wired.
- The following is to add the mkusb repositories:
sudo add-apt-repository universe
sudo add-apt-repository ppa:mkusb/ppa
- We update the repositories and install the software:
sudo apt-get update
sudo apt-get install mkusb
- Once installed we execute this command, where the name of the image will be that of your image with the path included. The "p" is for "persistent":
sudo -H mkusb ubuntu-18.10-desktop.iso p

- The options will appear in the same Terminal window. We choose the second, the "e" and press Enter.
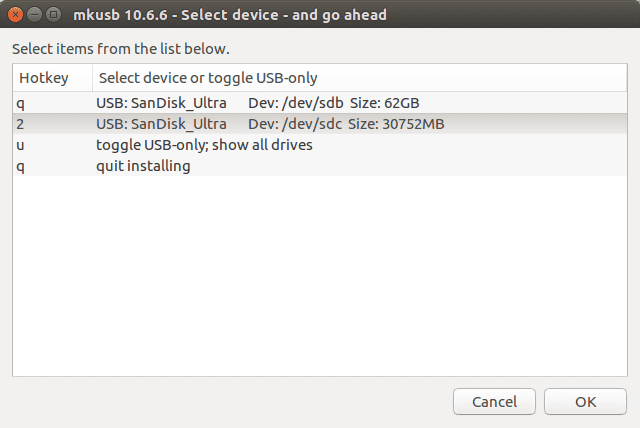
- The following is simpler. We choose the unit where we will install it.
- We mark the box to start the installation and we click "ok".

- In windows 4 and 5 we give the "q" to choose the default options.
- The last step is to choose the percentage that we will give to the persistent operating system. The rest will be like a normal USB drive. For example, if we have a 32GB pendrive, we can tell it to create the 50 persistent Live USB (= 50% = 16GB) and the rest is used to save data like any other pendrive.
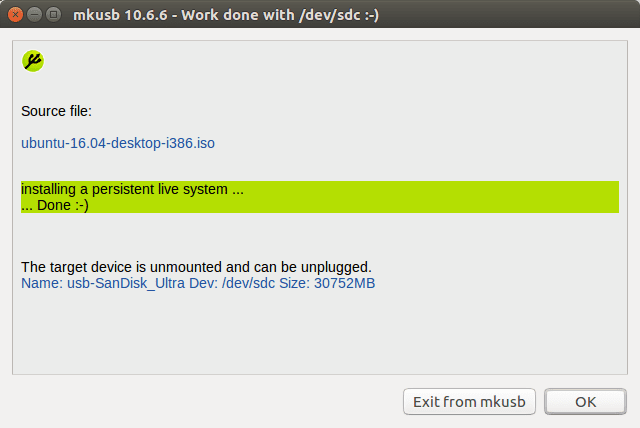
- We wait for it to be installed and, when the process is finished, we would already have it
If you have used other methods and they have failed you, it is normal that you think that this is not going to work, but it does work. In fact, you will check it as soon as you start the persistent Live USB because what you will see will be different from everything you have seen in other types of startup:
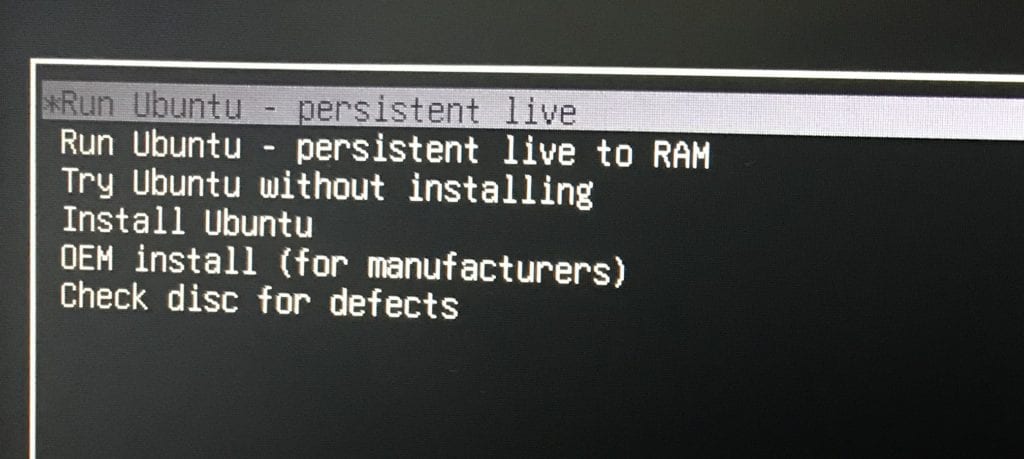
As you can see, there are two more options, of which we we are interested in the first if the computer has 4GB of RAM or less. The second option will take longer to start, but then it will go faster. Once started, what we see is very similar to what we see in a Live Session: on the left we see the direct access to the installation program (Ubiquity). Above, the hard drive. The icon of the installation app does not look like it should, but this is "normal" because it is an executable file that is not trusted in this type of usb. It can be executed, but first we will have to accept it as safe (double click and “trust and execute). Of course, the icon will never be restored.
And that would be all, or almost all: now we can treat it as a native system, so we can eliminate everything that we are not going to use and install what interests us the most. We can also update the operating system with the latest software available, which takes much longer than a hard drive installation. When updating a notice appears that automatic updates have been disabled; here we leave it as it is, for which we will choose the option that is marked by default.
Have you tried this method? How did it go? Do you know a better and easier method to create a persistent Live USB? Feel free to comment on your experiences.
Very interesting… But…. Does it work for distros that are not based on ubuntu / debian ...?
regards
Thank you
Programs such as Linux Live USB Creator (for Windows) allow you to do this directly at the same time that the bootable USB is created from the ISO, without the need to have two USB memory sticks and without further actions than checking a box and choosing the amount of memory to you want to dedicate.
I have not tested it to be able to say if it works well and is fully operational but of course it is much easier.
Hello, I would like to know what are the requirements that a pendrive must have, reading and writing speed and size so that it works in the best way and the minimums. Thanks a lot
Hello friend, I have the following problem once I restart to choose the option "Live persistence" begins to ask me about the language, the time zone and username, I thought it was fine but the screen where the messages are generated gets fed up partitions of the hdd and still choose the usb tells me that it has to be more than 16gb which is precisely the size of my usb. I write down that I'm doing it for a deepin iso
Hello, I installed it with Ubuntu 20.04, and when I start (ToRam) I get the same Try or Install window. What option should you take?
With linux mint ulyana gives me:
error: disk "hd0,4" not found.
error: you need to load the kernel first.
It has failed me...
I get this error:
'/tmp/tmp.sBM07ODO9V/boot/grub/grub.cfg' not found
'/tmp/tmp.sBM07ODO9V/boot/grub/grub.cfg': file not found
This way to use mkusb needs 'grub.cfg' from the source iso file, and it is available in Debian and Ubuntu family *amd64* iso files
I'm trying it with Ubuntu Studio 22.04, and they only have AMD64...
What can be done?
Thank you