
In the next practical tutorial I am going to teach them how to encrypt a text file to protect it with a password totally sure.
We will do this with gpg, a simple command to use through the comfort o terminal our Ubuntu or distribution based on Debian.
GPG It is extremely easy to use, since only accessing from the terminal to the path where we have the file to encrypt, and just by putting gpg -c, we will secure our file with a password totally safe and will be safe out of the gaze of the curious, ideal for people who share their personal computer.
So that you can see better how easy it is to use, we are going to do it with a text file called experiment and located in our Main desk, so let's get to work and let's get started with the hands-on exercise.
How to encrypt a file in Ubuntu
The first thing we should do is open a new terminal and go to Desktop:
- cd Desk

Once in the correct path of our file to encrypt, in this case the text file called experiment, we just have to type the command gpg -c plus the "name of the file to encrypt":
- gpg -c test

How to decrypt the previously encrypted file
For decrypt the file It will be as easy as accessing the path, remembering that in this case it was Desktop, and using the gpg command plus the name of the file to decrypt including its extension, in this case it would be:
- gpg test.gpg
Now we will only have to confirm that we are the owners of the file or that we have permissions by typing the password created in the previous step:
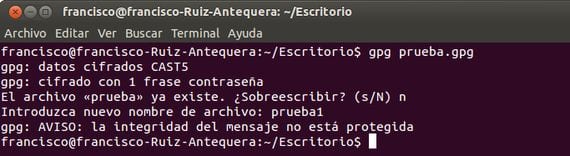
If we hadn't deleted the file experiment original, it will give us the option of overwrite or rename.
More information - How to install Ubuntu 12.10 alongside Windows 8
I was looking for something like that, thank you
salu2
Excellent and simple thanks