
Have you ever wanted to record your PC screen with Ubuntu and didn't know how to do it? We may want to capture the screen of our devices, mobile and desktop, for many and varied reasons. Among them is sharing on social networks, especially captures of a single image, or making tutorials. With the amount of developers and programs available for Linux, many times we don't know where to start, but what we want is videotape the screen from our PC, we can do it with the famous player VLC Media Player.
The best thing about using VLC to record our computer screen is that we can do it both in Linux, as in OS X and in Windows. Getting it is very easy, but you have to do all the necessary steps. There are tutorials that explain how to record the computer screen with VLC that are incomplete, they lack a step that if we do not take, at least on my computer with Ubuntu 15.10, it will not record the screen. Here are the steps to follow to do it successfully.
How to record PC screen with VLC
Updated in 2019: From what it seems, in 2019 it is not possible without first installing a package. Therefore, before we start we will have to open a terminal and type this command:
sudo apt install vlc-plugin-access-extra
And an important fact: we do not have to have the VLC in full screen or it will feed back and fail.
- Logically, the first step is to open VLC.
- Next, we open the menu Medium / Open Capture device.
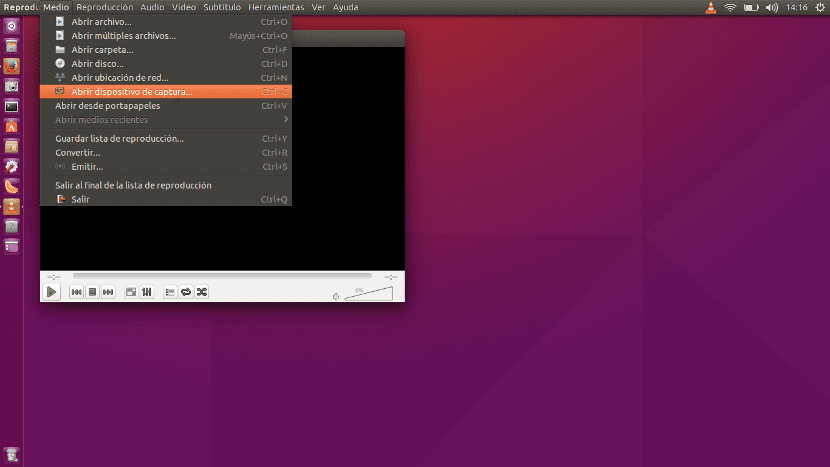
- In the window that opens we have to make three changes:
- We display the menu Capture Mode and we choose Desktop.
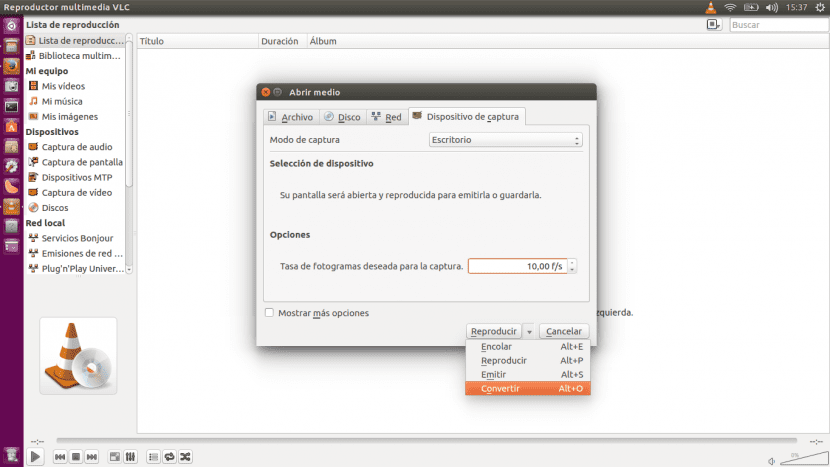
- This is an important point: we have to modify the Frame Rate. I have tried 10f / s and it works for me. Logically, it can be increased, but the default 1f / s won't work out too well (it didn't work for me anymore).
- At the bottom, we click on the triangle and select Convert.
- In the window that opens we will have to give the file a name including the extension. In the case of the example, I have used the name Ubunlog.mp4.
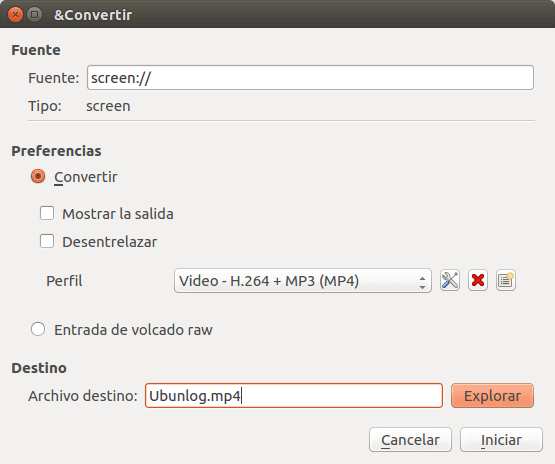
- In the Profile, we click on the tools icon and a window like the one below will open.

- Here we have to enter the Video Codec tab and change the Bit rate to 2000kb / s. Logically, this value can be modified, but with 2000 we know that it works.
- Then we click on Save. You will return to the previous tab. Steps 6 and 7 will only have to be done the first time we record the screen.
- Now all you have to do is click Start.
- To stop the recording, something that I do not like, we have to close VLC.
And we would already have it. The truth is that, knowing how to do it, it is simple. In addition, we will be using a program that we probably already have installed on the system. And more importantly, it's free and cross-platform. How about?
Every day something new is learned ... I did not know. I will try it! 🙂
I bought an Encore enltv.fm but I ended up doing it with Kazam, the rest is incomprehensible to me as a streamer, mencoder I cannot assign the input, whether it be tv, composite or s-video, it has been a headache, but the captures came out quite a lot good
great thanks. how many things one learns thanks to collaborative work.
The only tutorial that has worked! Big man
It is very good that it is free and multiplatform, in addition to quality, but I think it is excellent, and even more remarkable, that it is free, that allows greater confidence, tranquility and security 🙂
WORKS PERFECTLY WELL, as indicated in the tutorial, the values and options, all correct. I IS REASON for the start and end of the recording, the VLC options come out - which from today I consider the most powerful multimedia multi-utility - but it will be a matter of "cutting" the beginning and end (which VLC can do say).
As part of the test I recorded in WebM format (the future of Youtube)
ht tp s: // en.wiki pedia.org / wiki / WebM
and you can see it at the following web link:
https://www.youtube.com/watch?v=Ka2–uKLN7g
THANKS FOR THE INFO! 😎
I did not know that vlc function, will have to try
Hello, I want to recommend an easier tool, it is also free, it is called Apowersoft Online Screen Recorder. You can record the PC screen online, and upload the video directly to social networks. Also, there is no time limit, and the video is of good quality.
http://www.apowersoft.es/grabador-de-pantalla-gratis
Nothing online, that's just snooping. on the other hand in VLC I get: Your entry cannot be opened:
VLC is unable to open the MRL "screen: //". See the log for more details.
good, the tutorial is good, only that for my case the capture only looks black, I use debian 8. * xfce
It does not work for me because I will follow all the steps you said and I get a screen and it says: VLC is unable to open the MRL "screen: //". See the log for more details.
I had no idea this could be crazy ...
Thank you for the contribution. Excellent work.
Please a query, everything has worked well, however the audio does not work. Apparently it is because I have Audacity enabled to record audio. Please could you give me a solution to my problem. Thanks in advance.
Hi, I think I have followed all the steps ... I record video but no sound, what could this be?
thanks!
Once the frame rate is configured, we must expand in more options, and we will enable: play another multimedia ......, and we will configure: alsa: //, and we will continue, on the same page that explained this, it says that if it does not work with alsa is tested: press: //.
I hope it works, I get it from: https://radioslibres.net/capturar-pantalla-con-vlc-video-y-audio/
Good morning, I am the same as "sofa bed", I record video but no sound.
Hello, I did not know that player function, now following the steps it does not let me put a name .mp4 in the destination file, why is it?
thanks for this now I can upload my videos to
YOUTUBE
Good evening beyond that the explanation is deficient, it does not let me set the destination with which I cannot continue. I have Ubuntu 16.04.
it won't let me put anything in «Destination file»