
Taking advantage of the fact that days ago I installed the Ubuntu 9.04 beta, I took some screenshots of the process in question, since it will not change too much with respect to the final version, so it will be valid for when it is available.
For those who want to install the beta it is an obligation to say that its installation is not advisable in production environments, although I am testing it and these days it has not presented errors, but it is worth clarifying that it is a beta, not the final version, and it may still have bugs to correct, anyway if you are anxious, like me, you can download the beta version of Ubuntu 9.04 from here »Jaunty Jackalope»
Technical data
Hard Drive: WD 120Gb. IDE, EXT4 system partitioning, 15 Gb. For the root directory (/) the rest for the user partition (/ home) and swap partition (/ swap) 2Gb.
Processor: AMD Athlon 64 × 2 4200+
Motherboard: Asus Asus M2N-MX chipset NVIDIA GeForce 6100 / NVIDIA nForce 430 MCP
Installation
We place the Live-cd and configure the bios setup so that the pc starts from the cd-rom, the first thing we will see is this

We choose spanish

The options that interest us are the first two, «Test Ubuntu without altering your computer»Will start the live-cd and we can, in addition to testing the distribution, install it and«Install Ubuntu»Will start the installation itself.
I always choose the first one since while it is installed I can use the distribution.

When I finish loading the cd we will see this screen
Double click on the desktop icon Install…

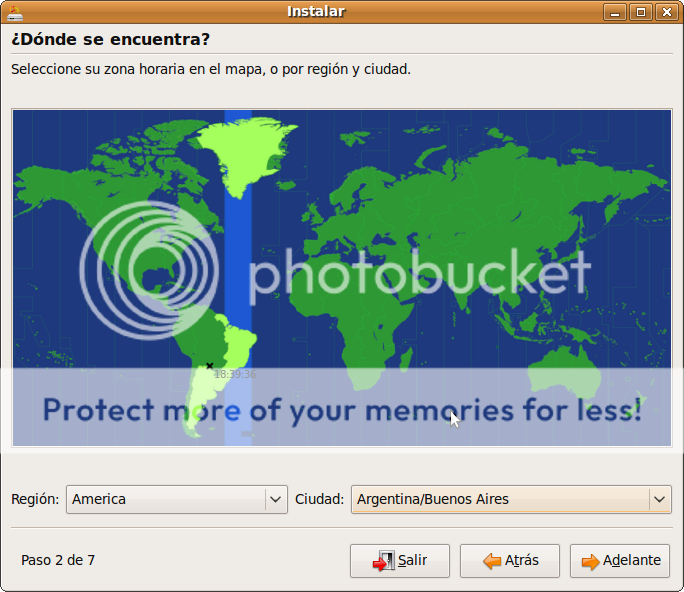
We chose our area, Buenos Aires is seen a little higher on the map 🙂
The installation wizard already suggests the most convenient keyboard layout for us in the dialog box, we can test it and if it is not the ideal one, we can change it.

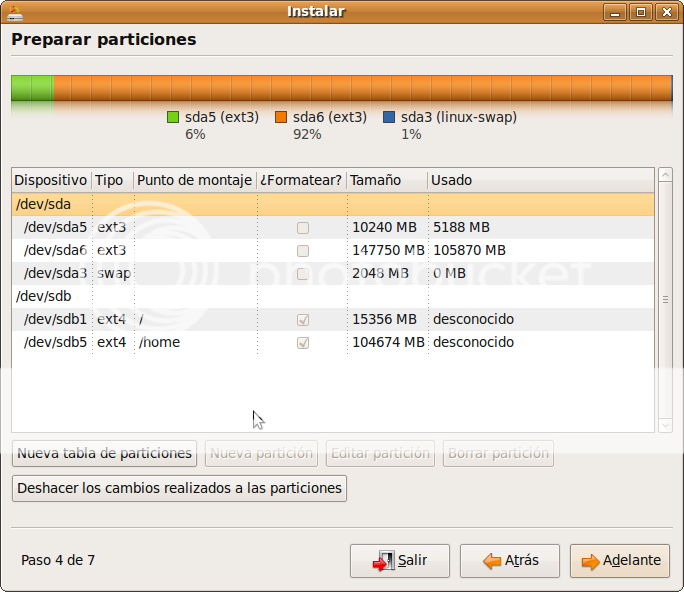
In the next step we get into the partitioning of the disk

I chose the option to specify the partitions manually to be able to make a partition for the file system (/) and another for the user (/ home) as seen in the image that follows, I already have an OS on the first hard drive (sda ) and Ubuntu 9.04 will install on the second 120GB disk. (sdb)

Double click on "free space" and we began to define the partitions, although I think I got out of hand and it could have been less, 15 GB for the root partition, the rest of the disk for the / home, ext4 system, the swap partition I have one on the first album so I'll use that one.


Next step, enter your name, username, password, team name, and choose the option to enter automatically or request a password for entry.

Option to migrate configuration from another installation, in my case it gives me the possibility to import configuration from Gaim, Firefox and Evolution, it never worked for me, if someone knows how to make this work, I will appreciate if you tell me 🙂

We are almost finished, what follows is a summary of what the installation will be, last opportunity to review everything.

We only have to click on Install and the process will begin.
After a few minutes the installation will conclude and we can restart the system to start using Ubuntu 9.04 or if we want we can continue using the Live-cd.

If you got this far you have successfully installed Ubuntu 9.04, you just have to restart and enjoy! 🙂
Hello, how much I try to use kubuntu 9.04 from the live cd and I can't get to the desktop. He gets stuck on a black screen with the mouse pointer and nothing else. My machine has an ECS elitegroup motherboard with an integrated GeForce 6100, 19 ′ Samsung SyncMaster 740nw LCD monitors, 1,5 gigs of ram, SATA 160 gigs disk. Well, I don't know what to do anymore. I tried with safe graphic mode and at least it shows me the screen where one can choose to enter a little better, but I still don't get to the desktop. I read out there that trying the alternate might be better for me, but I don't really trust it because I don't really know if I would have to load a video driver first or something like that and maybe I try and it doesn't work for me. Also I can not find how to load drivers from the board before installation. Where can I get them from?
I would appreciate you answer me. From already thank you very much. Ramiro.
@Pablo I don't remember the last time I did an installation with the alternate, but I think you don't need to load the motherboard driver to do the installation, the installation with the alternate version is very similar to that of LIVE CD but obviously there is no option to test the system before installing, otherwise I am almost sure that you will not need the motherboard driver to run it, I have that model of video card only another mother and I have not had problems with Jaunty, so if you dare I think the alternate cd will be fine.
regards