
In the next article we are going to take a look at installing NetBeans 8.2 on Ubuntu 18.04. As I suppose everyone knows by now, this is an IDE (integrated development environment) available for different platforms. About this program, a colleague already spoke to us in a very detailed way in a previous article.
NetBeans IDE provides users with a very powerful platform that enables programmers to easily develop applications Java-based web, mobile applications and desktops. Many say it is one of the best IDEs for C / C ++ programming. It also provides very useful tools for PHP programmers. The IDE provides support for many languages such as PHP, C / C ++, XML, HTML, Groovy, Grails, Ajax, Javadoc, JavaFX and JSP, Ruby and Ruby on Rails.
The publisher is feature rich and provides a wide range of tools and templates. It is also highly extensible using plugins developed by the community, which makes it suitable for software development.
Netbeans it is available in the Ubuntu repositories, so if we want to have a stable version in an easy way, we only have to go to the Ubuntu Software option. Once there we will only have to look for the word Netbeans and press the "Install" button. If on the contrary we want install a newer and custom version, we can do it manually. In this article we are going to see how to install the latest version of NetBeans today, which is 8.2. I am going to do this installation on Ubuntu 18.04, although it can also be done on Debian and Linux Mint.
First of all, we must clarify that to install version 8.2 of Netbeans we need to meet a couple of requirements on our computer. The first is that a minimum of 2 GB of RAM is required. And that we will have to have in our team the Java SE Development Kit (JDK) 8. It is necessary to install this IDE. NetBeans 8.2 does not run with JDK9, and doing so may cause errors.
Install Java JDK 8
A colleague already told us about the installation of different versions of Java on our Ubuntu system. To install the Java 8 JDK version we need, we will first add the webupd8team / java PPA to our system. To do so, we open a terminal (Ctrl + Alt + T) and type:
sudo add-apt-repository ppa:webupd8team/java

sudo apt-get update
Once our software listing has been added and updated, we will search for packages with the name oracle-java8 as shown below and finish installing:
apt-cache search oracle-java8

sudo apt-get install oracle-java8-installer
If you have more than one Java installed on your system, you can install the oracle-java8-set-default package to set Java 8 as the default:
sudo apt-get install oracle-java8-set-default
Install NetBeans IDE 8.2 on Ubuntu 18.04
Now using your preferred browser, go to the IDE download page and download the latest version from the NetBeans installer.


You can also download the NetBeans installer script on your system through the wget utility. To do this we open a terminal (Ctrl + Alt + T) and write:

wget -c http://download.netbeans.org/netbeans/8.2/final/bundles/netbeans-8.2-linux.sh
Once the download is complete, in the working directory if we use wget or in the place where we save the download from the browser, we will find the NetBeans installer. Now using the following command, we will make the script executable. Right after we will start with the installation:
chmod +x netbeans-8.2-linux.sh

./netbeans-8.2-linux.sh

After running the above commands, the installer 'welcome window' will appear. We will click Next to continue (or customize your installation by clicking Customize) and follow the installation wizard.
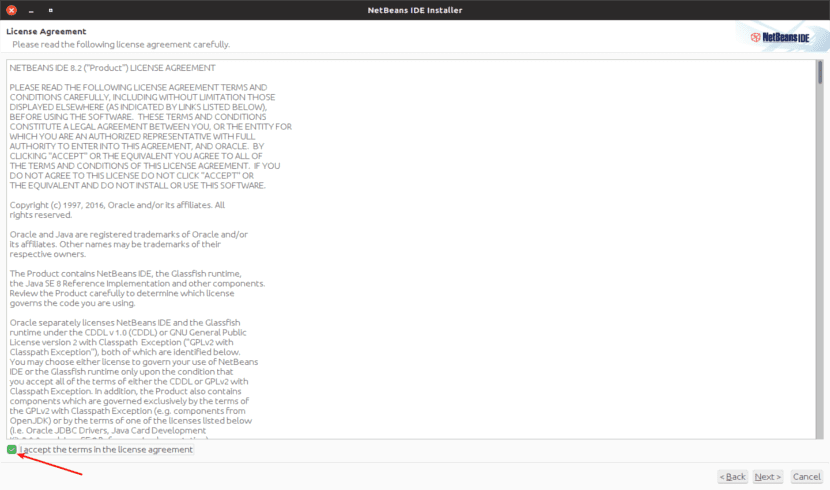
Then we will have to read and accept the terms in the license agreement. We continue on by clicking Next.
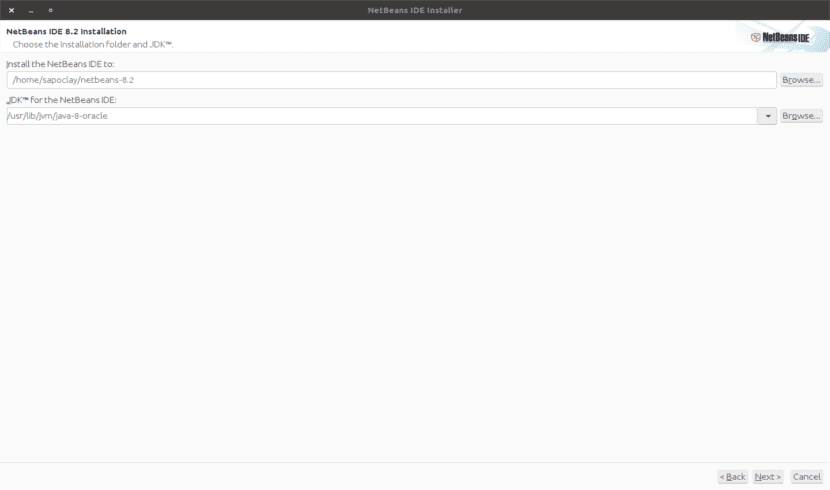
As you can see in the previous screenshot, we will select the NetBeans IDE 8.2 installation folder and the folder in which we have the JDK installed. We continue by clicking Next.
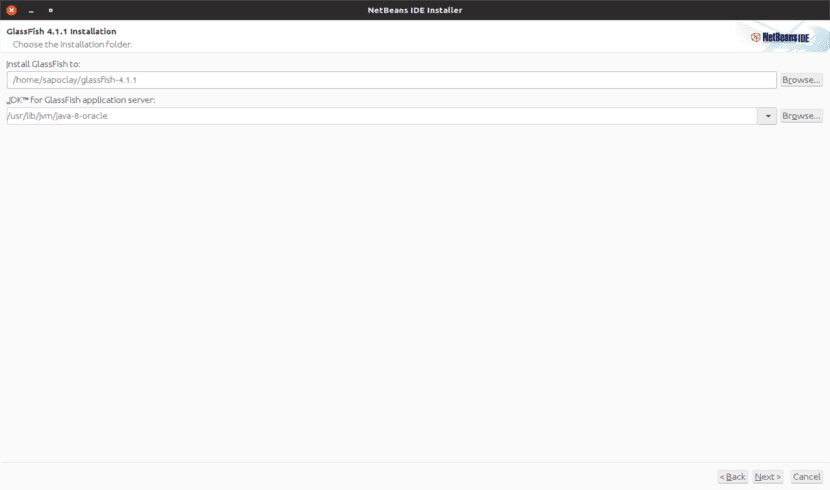
In the screen that we see now, we also select the GlassFish server installation folder. As before, we continue by clicking Next.
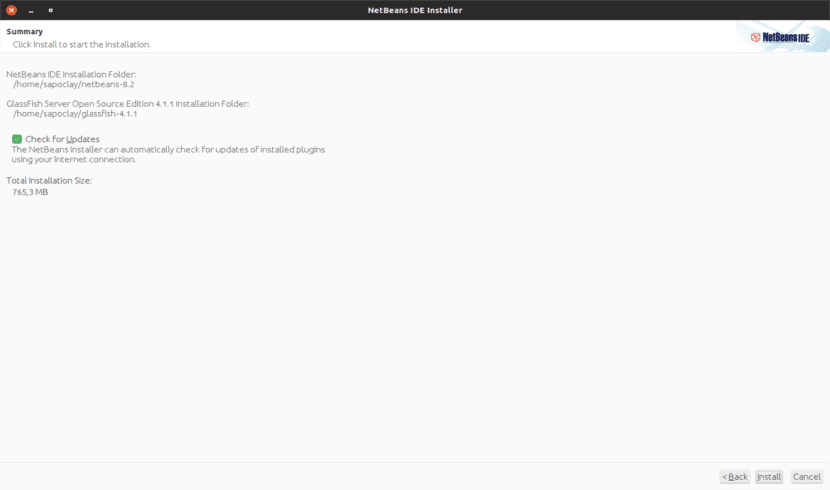
On the next screen, where the installation summary is shown. Here we will enable automatic updates for installed add-ons via the checkbox. Now we will click Install to begin the installation.

When the installation is complete, we will only have to click on Finish. We can now enjoy NetBeans IDE. We just have to look for it on our computer and click on the launcher.

Uninstall Netbeans
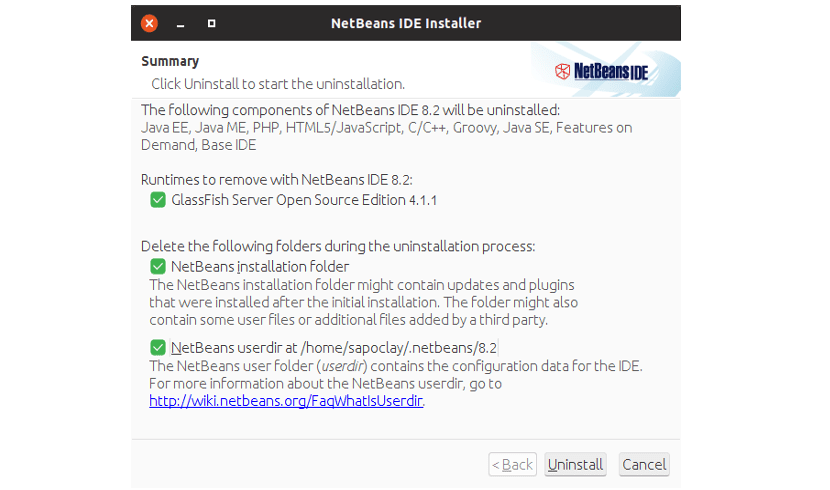
Removing this program is very simple. We will only have to go to the folder that we selected for the installation. Once there we will meet a file named uninstall.sh. This will be the file to run to completely remove the IDE from our team. In the terminal (Ctrl + Alt + T) we will only have to execute, from the folder where the uninstall file is located:
./uninstall.sh
Thanks for such a good explanation. It works wonders.
Hello, thanks for your contribution, I did all the steps, but when I open the program it does not open any project or any file, or anything else, what can I do about it?
Hello. Try uninstalling Netbeans and download the "All" version. If it still doesn't work for you, try installing another version of Java (and set it as the default on your system). Salu2.
Friend install netbeans 8.2 all and it happens to me the same thing runs netbeans but the buttons to create a new project does nothing, it does not open the modules similar to the case of friend Cesar
Another thing, how can I unpack the JDK that I installed?
Hello Nestor, I am going to leave you a video that if you follow him to the letter you will solve the problem, basically it is about specifying in netbeans the version of java with which you are working, that is, the one you have installed in your OS . This I realized that also the same IDE gives you the possibility to specify it in the installation. Here the video:
https://www.youtube.com/watch?v=GYURxhUDR_0&t=53s
Hello guys, I stopped by the UBUNTU store and there I found NetBeans.However, an error occurred to me and I went to the web and I found these terminal codes and now I am downloading it 😉
this is the link :
http://www.javiercarrasco.es/2013/02/08/no-se-pudo-bloquear-varlibdpkglock-open-11-recurso-no-disponible-temporalmente/
Thank you friend!
Running the command sudo apt-get install oracle-java8-installer it shows me this
The oracle-java8-installer package is not available, but some other package references
to the. This may mean that the package is missing, obsolete, or only
available from some other source
hello something like that happened to me, what I did was the following
apt search jdk
sudo apt install openjdk-8-jre
sudo apt install openjdk-8-jdk
thank you very much.
Apache Netbeans already removed Netbeans 8.2