
En Ubuntu almost all the software you own has GPL licenseIn other words, you can acquire a license for the program you want without having to pay anything as with Microsoft Windows. But how in almost everything, you need a beginning with which to create those programs and even for that Ubuntu stands out above all, well to be honest it highlights the Free software. Today I intend to bring you a small guide to have a IDE in our team for those who wish learn to programWell, those who already know this guide will find it very obvious.
What is an IDE?
Un IDE is a software package that brings together various tools aimed at creating software. As a general rule, everything IDE It has an editor with which to create the source code, a compiler to compile that code, and an interpreter that can interpret that code, although nowadays almost all IDE have many more tools or extensions through plugins or plugins, such as connections to databases (something essential), an interface WYSIWYG or the possibility of creating software with various programming languages and the list of possibilities goes on and on. Currently stand out two IDE's that have a free license, GPL and that are multi platform, so not only can we install it on Ubuntu but we can also install it on MacOS or Windows and even on a USB. Are Netbeans and Eclipse, although we can also find some for other platforms that stand out and are free, as is the case with Visual Studio. Today I wanted to teach you how to install Netbeans in our Ubuntu, but the version that we want.
Preparing our Ubuntu for Netbeans
Netbeans It is found in the Ubuntu repositories, so if we want to have a very stable version, almost obsolete in our system and easily, we just have to go to the Ubuntu Software Center, search by the word Netbeans and press the button «Install«. If, on the other hand, we want to install a more recent and personalized version that is also very stable, we can do it manually. To do this, we first open the terminal and install the java packages that the IDE needs. Although for the rest of the languages, Netbeans brings the necessary packages, in the case of Java it is necessary to have the JDK and the Java Virtual Machine for Netbeans can work with this language. So we write in the terminal:
sudo apt-get install icedtea-7-plugin openjdk-7-jre
These packages correspond to the free Java equivalents, but if we want to have the proprietary Java software installed, we go oracle version, we have to do the following:
sudo add-apt-repository ppa: webupd8team / java sudo apt-get update sudo apt-get install oracle-java7-installer
With all this we will have installed the necessary version of Java, if we doubt we will only have to write in the terminal the following command
java -version
And we will see what version we have, if not we have to repeat the previous steps. Once we have Java we go to the netbeans website, there we go Downloads and the following screen will appear 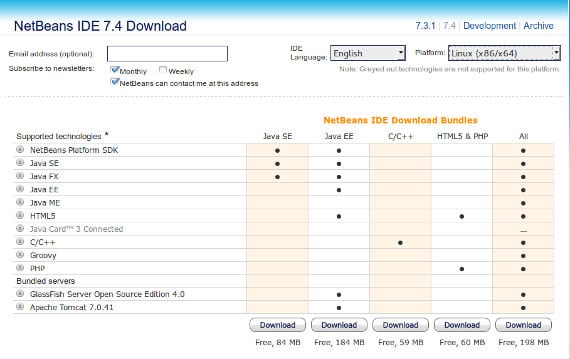
As you can see, there are 5 versions to download in each of the main versions of Netbeans. That is, each version has 5 different packages. He Java SE is the parcel of basic java, so it is aimed at the most expert programmers in Java. He java ee It is the version for Java newbies who need to have more packages when programming. C / C ++ is the package of Netbeans which only program in C/C++, HTML5 & PHP is the package of Netbeans which only program in html and php and the All package is the full version of Netbeans with support for all previous programming languages. Once we choose the version (top) and package, we click download and download a file that ends in sh. Now we open the terminal again and we are located where the downloaded file is, which usually is ~:/Downloads and we write
sudo chmod +x package_we_downloaded.sh
sh package_that_we_downloaded.sh
After which the installer will start and we will have to follow the orders that it asks us, but it will be like the typical installer «next, next«. When finished we will have ready our Netbeans IDE to be able to program and experiment with it. If you are already a master programmer, I imagine that you already know what to do, if not, currently there are many MOOC's and courses on Youtube that teach you to program and for a small price: 0 euros, take advantage of it.
More information - The Ubuntu Mobile SDK: How to create an app, Sublime Text 2, a great tool for Ubuntu
Source and Image - Netbeans Official Website
Hello! Greetings from Panama. Look, I've gotten tired of using Windows, and I've also researched what programming languages are. I'll be clear, I'm a total newbie. I installed Ubuntu 12.04 LTS and deleted Windows from my pc, and I'm interested in programming in Java (also because it allows me to use what Arduino is).
I've been trying to install Netbeans from the ubuntu software center and when starting a project it wouldn't load.
I had previously seen this blog, and came across this tutorial now. ok, I have followed all the steps but I have not understood the final part well:
«Once we choose the version (top) and package, we click download and download a file that ends in sh. Now we open the terminal again and we are located where the downloaded file is, which is usually ~:/Downloads and we write
sudo chmod +x package_we_downloaded.sh
sh package_we_downloaded.sh »
I already downloaded the package that I selected, I replace with the name of the package and it tells me that the directory does not exist, and nothing happens.
I am looking forward to your response.
William Wilson, I don't know if the info will be useful to you at this point, but here it goes:
1 You must write in the terminal ls
with that it will show you the directories.
2 If you have the .sh file in the downloads directory, you must write cd Downloads
3 Continue with what you are missing from the tutorial, since you will be located in the folder.
I don't think this will help you now, but it will help someone. Greetings
Thank you Stephen