
Ruby Version Manager, often abbreviated as RVM, is a software platform designed to manage multiple Ruby installations on the same device.
The entire Ruby environment, including the Ruby interpreter, installed RubyGems, and documentation, is partitioned. A developer can then switch between the different versions to work on various projects with different version requirements.
Also, RVM works as an installer for other Ruby implementations. These include JRuby, mruby, MacRuby, IronRuby, Maglev, Rubinius, Ruby Enterprise Edition, Topaz, and GoRuby. Additionally, RVM supports the installation of patched versions of MRI.
Basically RVM makes it easy for the user to install and switch between multiple versions of Ruby on OS X and Linux.
It is also possible to install different levels of patches and Wayne has put together a list of examples to show you the various things RVM can do from the command line (including gem management).
RVM provides features for organizing Ruby gems through "gemsets", collections of gems separated by a namespace, and an associated Ruby installation.
How to install RVM on Ubuntu and derivatives?
For those who are interested in being able to install this application on their system, they must follow a series of steps to obtain this excellent tool.
The first thing we should do is open a terminal in our system with Ctrl + ALT + T and in it we are going to execute the following command:
sudo apt-get install software-properties-common
Done this now we are going to support ourselves with the following command to add the application repository to our system with:
sudo apt-add-repository -y ppa:rael-gc/rvm
We update our list of packages and applications with:
sudo apt-get update
Finally We proceed to install the application with:
sudo apt-get install rvm
Once the RVM installation is done, it is now necessary to carry out this step to always load RVM. We must make a change in the terminal that we use so that it always makes a login.
In the case of the Gnome terminal, they must do this:
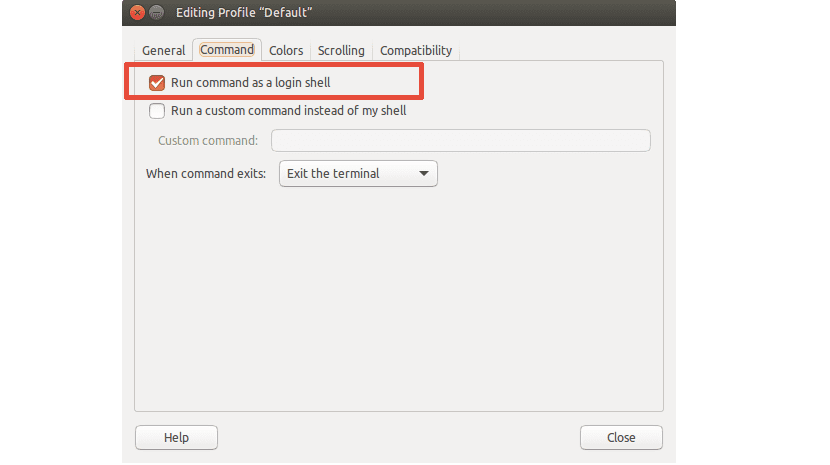
Once the change has been made, it is necessary to restart your system so that the changes made are loaded at the beginning of the system.
And ready with it, you will be ready to start using this excellent tool on your system.
Installing Ruby on Ubuntu and derivatives
Already with the help of RVM in our system we can install Ruby with the help of it, just base with running the following command:
rvm install ruby
Now Basic RVM usage scenarios include installing and switching between different versions of ruby.
Basic use of RVM
When no version is specified, RVM will install the latest stable version or the selected interpreter.
If you omit to specify the interpreter, RVM will assume that you want to install Ruby MRI. The following examples would have exactly the same effect:
rvm install ruby-2.3.1

rvm install ruby-2.3

rvm install 2.3.1

rvm install 2.3
Now as you can see It is possible to install multiple versions of Ruby with which you can make use of this benefit for any of your projects or jobs.
The point now is set a Ruby version as default, for this we can make use of the flag:
rvm use INTERPRETER[-VERSION] --default
Now the applied Example would be as follows:
rvm use jruby-1.8 --default
In this case we are using the Java implementation for Ruby. But for example if I'm only interested in Ruby, just run it as follows:
rvm --default use 2.1.1
We check the version with:
ruby -v
And it will give you an output of the type:
ruby 2.1.1xxxxx
Si you want to know the Ruby installations that you have done, just run:
rvm list rubies
Or for example if you want to know the version that you defined as default:
rvm list default
Finally, if you want to delete or remove from your system you can use the following commands:
rvm remove # Elimina los archivos ruby, source y gemsets / archives opcionales
rvm uninstall # Simplemente elimina el rubí - deja todo lo demás.
If you want to know more about your use, You can visit their website where you will find a lot of information about their use.
Finally with your tutorial I have been able to install RVM, since I have tried before with others and there was no way. Everything was perfect the first time.
Thank you very much.