
In the next article we are going to take a look at Vundle. Today, despite all the editors in the world, Vim is undoubtedly one of the most powerful and versatile tools for manipulate text files, manage system configuration files and write code. Much to the regret of many users who detest this editor. Vim's functionality can be extended to different levels using plugins, and these can be controlled by Vundle.
This is an extremely useful plugin for manage Vim plugins. Vundle creates a separate directory tree for each plugin we install and stores additional configuration files in the corresponding plugin directory. In short, it will allow us to install new plugins, configure existing ones, update them, search for installed plugins and clean unused plugins. All actions can be performed with a single keystroke interactively.
Vundle Installation
If you need Vundle, imagine that you have already installed vim on your system. If that is not the case, install vim and git (to download vundle). You can use the following command to install these packages on Debian-based systems:
sudo apt-get install vim git
Download Vundle
Let clone Vundle repository:
git clone https://github.com/VundleVim/Vundle.vim.git ~/.vim/bundle/Vundle.vim
Configure Vundle
To tell vim to use the new plugin manager, we need to create the file ~ / .Vimrc.
vim ~/.vimrc
Put the following lines at the top of this file:
set nocompatible              " be iMproved, required
filetype off                  " required

" set the runtime path to include Vundle and initialize
set rtp+=~/.vim/bundle/Vundle.vim
call vundle#begin()
" alternatively, pass a path where Vundle should install plugins
"call vundle#begin('~/some/path/here')

" let Vundle manage Vundle, required
Plugin 'VundleVim/Vundle.vim'

" The following are examples of different formats supported.
" Keep Plugin commands between vundle#begin/end.
" plugin on GitHub repo
Plugin 'tpope/vim-fugitive'
" plugin from http://vim-scripts.org/vim/scripts.html
" Plugin 'L9'
" Git plugin not hosted on GitHub
Plugin 'git://git.wincent.com/command-t.git'
" git repos on your local machine (i.e. when working on your own plugin)
Plugin 'file:///home/gmarik/path/to/plugin'
" The sparkup vim script is in a subdirectory of this repo called vim.
" Pass the path to set the runtimepath properly.
Plugin 'rstacruz/sparkup', {'rtp': 'vim/'}
" Install L9 and avoid a Naming conflict if you've already installed a
" different version somewhere else.
" Plugin 'ascenator/L9', {'name': 'newL9'}

" All of your Plugins must be added before the following line
call vundle#end()            " required
filetype plugin indent on    " required
" To ignore plugin indent changes, instead use:
"filetype plugin on
"
" Brief help
" :PluginList       - lists configured plugins
" :PluginInstall    - installs plugins; append `!` to update or just :PluginUpdate
" :PluginSearch foo - searches for foo; append `!` to refresh local cache
" :PluginClean      - confirms removal of unused plugins; append `!` to auto-approve removal
"
" see :h vundle for more details or wiki for FAQ
" Put your non-Plugin stuff after this line
Lines that are marked "required" are Vundle requirements. The rest of the lines are only examples, which we can eliminate if we want. Once finished, we save the file with : Wq.
Now we can open vim:
vim
Install add-ons
To install the add-ons we will write inside the editor:

:PluginInstall
A new window will open divided with all the plugins we add in the .vimrc file, which will be installed automatically.
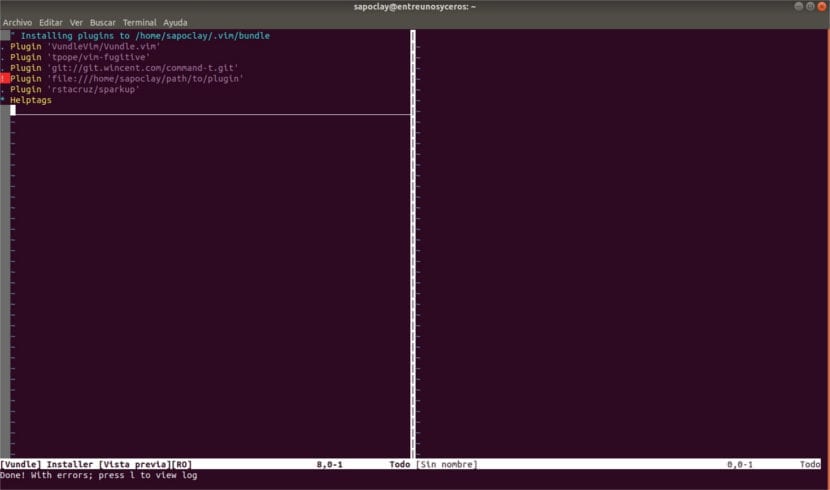
When the installation is complete, we must clear buffer cache typing the following command:
:bdelete
We can also install plugins without opening vim. You just have to use this command from the terminal:
vim +PluginInstall +qall
Manage Vim plugins with Vundle
Add new plugins
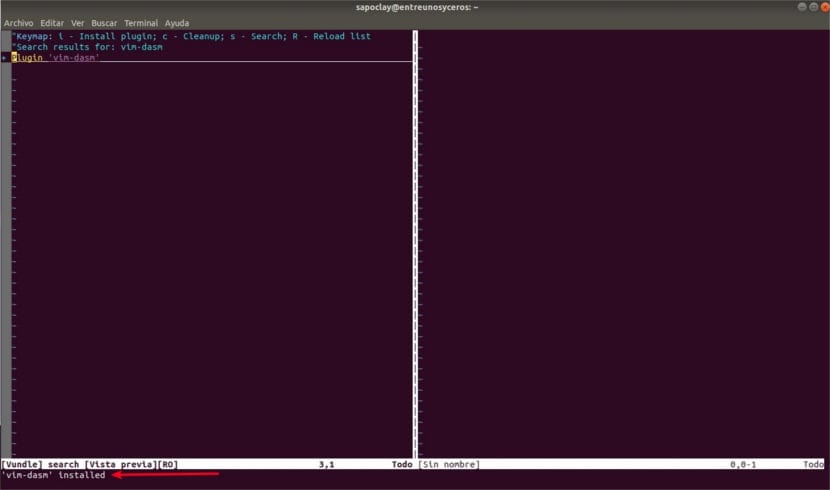
First, look for the available add-ons using command:

:PluginSearch
For update local list from vimscripts site, add "!" at the end:
:PluginSearch!
A new split window will open showing all available plugins.
We will also be able to specify the exact name of the plugin What are we looking for:
:PluginSearch vim-dasm
To install a plugin, move the cursor to the line that interests you and press «i». This will install the selected plugin.
Similarly, install all the add-ons you want to have on your system. Once installed, clear the Vundle buffer cache using command:
:bdelete
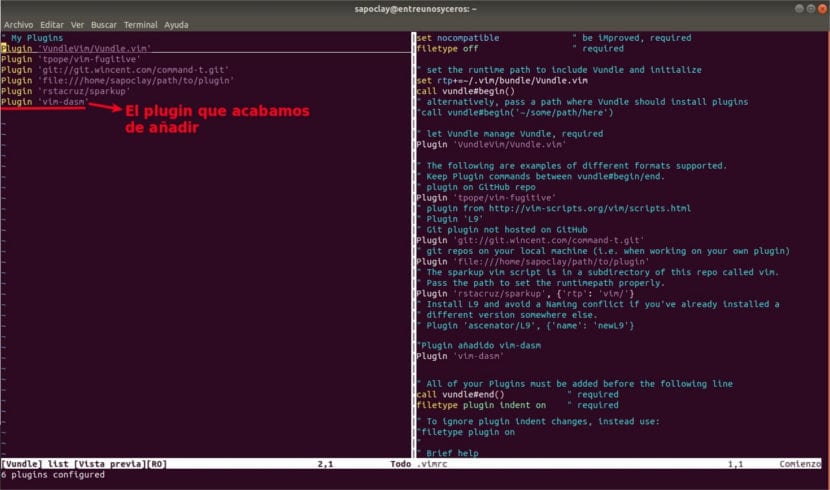
For the automatic loading to be successful, we must add the name of the installed plugin to the .vimrc file. To do this, write inside vim:
:e ~/.vimrc
Inside the file add:
Plugin 'vim-dasm'
Replace vim-dasm with the name of any plugin. Now press the ESC key and type: wq to save the changes and close the file.
Note that all your plugins must be added before the following line in the .vimrc file:
filetype plugin indent on
List of installed plugins
For list installed plugins, write from the vim editor:
:PluginList
Update plugins
For update all installed plugins, writes:
:PluginUpdate
Reinstall plugins
For reinstall all plugins, writes:
:PluginInstall!
Uninstall add-ons
First, list all installed plugins:
:PluginList
Now place the cursor on the correct line, and press SHITF + d:
:e ~/.vimrc
Then edit the .vimrc file and remove the added entry that reference the plugin. Writes : Wq to save the changes and exit the editor.
Help

This is just the tip of the iceberg, we can get more information about the use of Vundle in your GitHub page. For more details we can also consult the help section by typing the following in the vim editor:
:h vundle
Thank you very much for the page many is a little a million and much more ... I learned a lot about vim
greetings from Warsaw.