
In the next article we are going to take a look at Densify. If you are interested compress PDF files but you don't like having to use the terminal of your Gnu / Linux system. There is an alternative for users like you, who prefer a graphical user interface (GUI) to compress these types of files. This is a GTK + application written in Python. It is also worth mentioning that all this was developed with Atom, running on Ubuntu 17.10 / 18.04 systems.
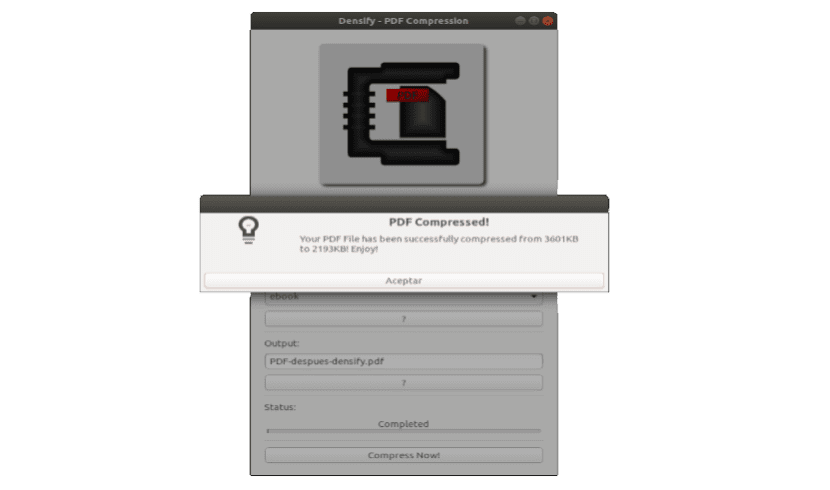
Densify is a graphical user interface that simplifies the process of compressing PDF files on Gnu / Linux with Ghostscript. This application will provide us with a simple interface that allows the user to select the PDF file to be compressed. It will also allow you to select the optimization level for the PDF and the output file name. By default this file will be named as compressed.pdf. This way the original file will not be lost.
Optimization levels possible for PDF with Densify
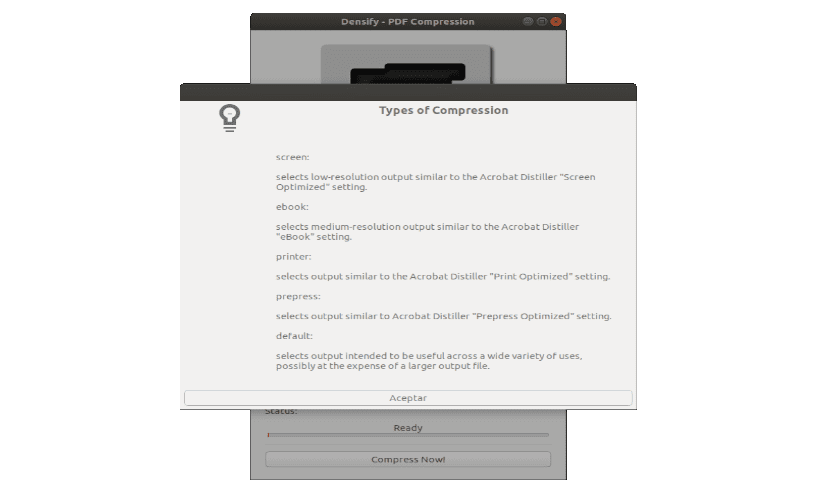
The optimization levels of the PDF can be found in the option Type. In addition, just below, all of them are explained to Click on ?. These optimization levels are as follows:
- Screen: select an output from low resolution. Similar to setting Acrobat Distiller 'Optimized display' / 72 dpi images.
- Ebook: provides us with a medium resolution output. Similar to Acrobat Distiller's 'eBook' setting / 150 dpi images.
- Printer- Obtains results similar to Acrobat Distiller. '' 300 dpi optimized print / image settings.
- prepress- Select an output similar to Acrobat Distiller. 'Optimized pre-print settings' / 300 dpi images.
- Default: select the output intended to be used in a wide variety of uses. Possibly at the expense of a larger output file.
Ideally, to find the desired value, it will be to test this configuration and see which is the best for each use case. For example, the screen and ebook PDF optimization level will compress our PDF more. When finished, check the quality and see if you are satisfied with the final result.

Densify compresses PDF files using Ghostscript. This is an interpreter-based software package for the PostScript language for PDF. Its use ranges from the rasterization or representation of said files, the display or printing of document pages, to the conversion between PostScript and PDF files.
Download and install Densify

To use Densify, you will need Python2, python-gi and Ghostscript. We will be able to install these packages on Debian, Ubuntu and Gnu / Linux distributions based on Debian / Ubuntu, such as the elementary operating system or Linux Mint. For the installation, we will only have to open a terminal (Ctrl + Alt + T) and write in it:
sudo apt install python-gi ghostscript
Now we are going to download the latest Densify .tar.gz file from your releases page on GitHub. Extract the content in your home folder. You should now have a folder called Densify-0.2.0 (the version may vary depending on when you read this article) that we can install in / opt moving it there. To move the folder, in the same terminal, just type the following command:
sudo mv Densify-0.*.0 /opt/Densify
To finish, we are going to install the Densify menu entry. Assuming the app is installed on / opt / Densify en / usr / local / share / applications /. To do this, we now write in the terminal:
sudo mkdir -p /usr/local/share/applications/

sudo cp /opt/Densify/densify.desktop /usr/local/share/applications/
After the installation, you should find Densify in the application menu of your operating system. For this example, I am using Ubuntu 18.04.
Remove Densify
In case we want remove Densify from our operating system, we are only going to have to use a couple of commands. To do this, we open the terminal (Ctrl + Alt + T). We are going to start by deleting the folder where we copy the application files with the following command:
sudo rm -r /opt/Densify
Now we only have remove launcher that we add to the Ubuntu applications menu. We will do this by writing in the same terminal:
sudo rm /usr/local/share/applications/densify.desktop
If anyone wants know more about this application, You can check the page of GitHub of the project.
I had problems in KDE Neon, it didn't work for me