
When it comes to managing media on Linux, there are many different options like local media management tools like Kodi and OSMC and server-based tools like Mediatomb.
Suffice to say, there is no shortage of tools to manage your media on Linux. The server Plex Media is perhaps one of the most popular solutions for managing media.
It is a free and proprietary media center that can run as a dedicated media server on Linux, Windows, Mac, and even BSD.
Plex is compatible with server operating systems, although its operation is not limited in them, but it can also be used in desktop computers.
This is an application that acts as a media server that helps you organize and share all your personal media.
The app can organize your media libraries and streams to any device, including all your video, music, and photo libraries.
With a Plex Pass, a supported tuner, and a digital antenna, you can also watch and record your free-to-air TV channels, including major networks.
How to install Plex Media Server on Ubuntu?
For those who are interested in being able to install this excellent application, They will be able to do it quite simply.
The first thing we are going to do is open a terminal in our system with Ctrl + Alt + T and in it we are going to execute the following command, which will add the Plex repository to our system:
echo deb https://downloads.plex.tv/repo/deb public main | sudo tee /etc/apt/sources.list.d/plexmediaserver.list
It should be noted that this command is to work for any distribution that supports the installation of deb packages.
After that we will have to import the public Plex key with:
curl https://downloads.plex.tv/plex-keys/PlexSign.key | sudo apt-key add -
Once this is done, we will update our list with:
sudo apt update
And finally we can install with:
sudo apt install plexmediaserver
Install from deb package
Another way we have to obtain this application is by downloading its deb package, which we can obtain from the following link.
From the terminal we can do it, Typing the following command if your distribution is 64-bit:
wget -O plexmediaserver.deb https://downloads.plex.tv/plex-media-server/1.14.1.5488-cc260c476/plexmediaserver_1.14.1.5488-cc260c476_amd64.deb
Or if you are using a 32bit distribution, the package for your architecture is:
wget -O plexmediaserver.deb https://downloads.plex.tv/plex-media-server/1.14.1.5488-cc260c476/plexmediaserver_1.14.1.5488-cc260c476_i386.deb
Installation from Snap.
Finally, the last method we have to install this application is through snap packages.
Which by the way Plex was placed within the top 10 of the most requested applications in this format, you can check the article here.
To perform the installation by this method, just open a terminal and type in it:
sudo snap install plexmediaserver --beta
They should note that the server is free, but the client application is paid.
To avoid this limitation and watch the movies on your smartphone or tablet, you can do so by accessing it from the browser using the address "http: // ip-address: 32400 / web".
Where "ip-adress" is the local ip address of the computer where the Plex server is installed.
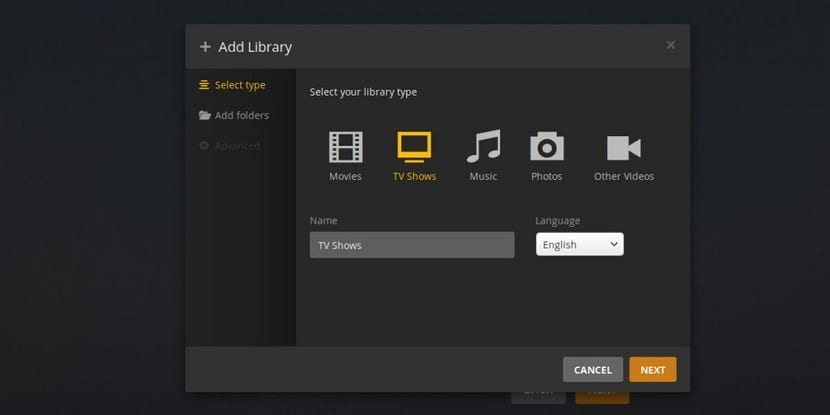
Setting up Plex
To configure Plex, open a web browser and load the web interface, so if you are going to configure it from the computer where it is installed they should only go to:
http: //localhost:32400/web
After that they will need to create an account and register, a Plex Pass message will appear. Don't worry, Plex can be used for free. Close the indicator by clicking the X button
The Plex webUI will take the user through the setup process. Start by giving the Plex server a familiar name, to make it easier to recognize in your Plex account.
Although it seems annoying to sign up for an account, having one for the Plex service makes it easy for non-tech savvy family or friends to easily access the media.
Since the service automatically finds devices on the network, no one will have to tinker to get it working.
From now on the interface is quite intuitive and tells you what type of file you can add in each menu.