In the next article we are going to take a look at Buku. This app is a free and open source command line bookmark manager, available for Gnu / Linux. With this software we can automatically import bookmarks from our Firefox, Chromium or Chrome browser and open the bookmarks from these browsers. Besides power automatically import bookmarks We can also search for the title and description of a marked URL from the web.
With this bookmark manager we can use our favorite editor to edit and update our own bookmarks. Some other features that we will find available are the possibility of using regular expressions in the search options in deep scan mode, to find any marker. This is a privacy-focused bookmark manager, without any hidden history storage and usage analytics. Another nice feature is that allows to import and export bookmarks to HTML, Markdown or Orgfile. The program is written in Python3 and SQLite3 and released under the GNU General Public License v3.0.
General characteristics of Buku
- The program allows us to enjoy a clean and light interface in terminal.
- We will be able import / export bookmarks from / to HTML, Markdown or Orgfile.
- We will have the possibility of making a automatic import from Firefox, Google Chrome and Chromium.
- Will allow us store bookmarks with title, tags and description, automatically retrieved from browsers.
- We can open bookmarks and search results in some of the supported browsers.
- The program also allows us a integration with text editor.
- We will find available the possibility of using powerful search options (eregular expressions, substrings ...)
- We will have the possibility to use a portable and mergeable database to sync between systems.
- Smart tag management by redirect (>>,>, <)
- Full multithreaded DB upgrade, manual encryption support.
- We will find available sequences of shell completion commands and manual page with helpful examples.
- Confidentiality, it works without collection of unconfirmed user data.
These are just some of the features of this program. They can consult all of them in more detail from the project GitHub page.
Install Buku Bookmark Manager on Ubuntu
Using the .deb package
Ubuntu users can download Buku Bookmark Manager as a .deb file from the releases page. As of this writing, the downloaded file is named 'buku-cli_4.3-1_ubuntu18.04.amd64.deb'.

wget https://github.com/jarun/buku/releases/download/v4.3/buku-cli_4.3-1_ubuntu18.04.amd64.deb
Once the download is finished, we only have to open a terminal (Ctrl + Alt + T) and move to the folder in which we have saved the downloaded file. Then we will execute the following command to begin the installation:

sudo dpkg -i buku-cli_4.3-1_ubuntu18.04.amd64.deb
At the end of the installation we will see problems with the dependencies. The next step will be to run this other command to install all missing dependencies:
sudo apt-get install -f
Using PPA
Another way to install this program will be using the following PPA to install buku on Ubuntu and its derivatives. To start we will add the PPA opening a terminal (Ctrl + Alt + T) and typing in it:

sudo add-apt-repository ppa:twodopeshaggy/jarun
Next, and after updating the list of software available in the repositories, we can proceed to the program installation with the command:

sudo apt install buku
Some usage examples
We will be able to execute the following command in the terminal (Ctrl + Alt + T) to automatically import Firefox, Chromium and Google Chrome bookmarks, as we are interested in:

buku --ai
For export all bookmarks, the command to execute would be the following:

buku --export marcadores.html
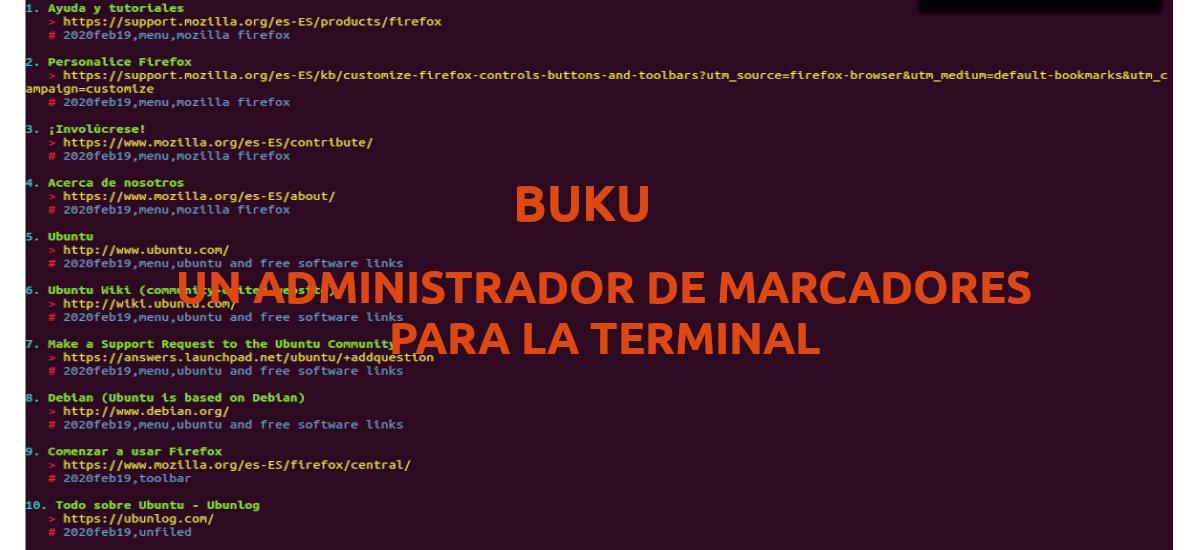
We can list all our imported bookmarks running this command:
buku -p
If we want add and edit a bookmark manually, you just have to run this other command:
buku -w 'gedit -w'
To get help about this program, we will only have to write in the terminal:

buku
To immediately start using buku, users can go to the section Quick start posted on their GitHub page. On this GitHub page we can also find the full list of commands for buku.
How do you make the prom look like this?
It is the basic configuration using Powerline. But if you look at the documentation you can configure the command line to your liking. Salu2.