In the next article we are going to take a look at ElasticSearch. It's about a full-text search server based on Lucene. In this quick post, we'll see how we can install one of the most popular text search and indexing platforms on Ubuntu, and get started with it.
This search server provides us with a distributed, full-text search engine with a web interface. RESTful and with JSON documents. Elasticsearch is developed in Java and is released as open source under the conditions of the Apache license.
ElasticSearch database
Elasticsearch gives us the possibility of using one of the databases NoSQL More popular that we will be able to use to store and search text-based data. It is based on Lucene indexing technology and enables retrieval of searches in milliseconds based on indexed data. It supports database queries through REST API. This means that we can use simple HTTP calls and use HTTP methods like GET, POST, PUT, DELETE, etc. to access the data.
To install Elasticsearch on Ubuntu, we must first install Java in our operating system. We can check if we have Java installed using the following command in the terminal (Ctrl + Alt + T):
java -version
When we execute this command, if we obtain the result shown in the following screenshot, it will be because Java is not installed on our computer:
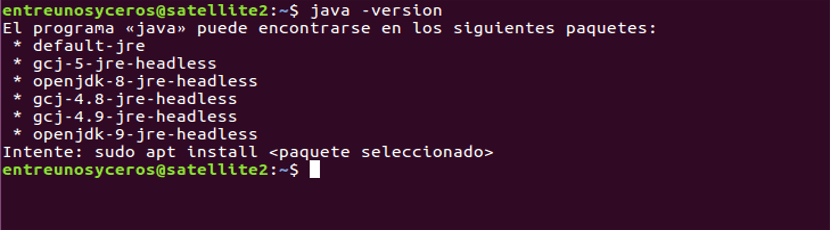
If this is our case, we can install Java by following the article that a colleague left in his day in this blog or using the following commands in our terminal (Ctrl + Alt + T):
sudo add-apt-repository ppa:webupd8team/java
sudo apt-get update && sudo apt-get install oracle-java8-installer
Once these commands are run, we can verify again that Java is now installed using the same command we tested earlier.
Installing ElasticSearch
Now, ElasticSearch installation is just a matter of a few commands. To start we will download the ElasticSearch .deb package from your web page. In the terminal (Ctrl + Alt + T) we will only have to write the following command:
wget https://artifacts.elastic.co/downloads/elasticsearch/elasticsearch-6.2.2.deb
When we execute the above command, we will see a result like this:

Once the download is finished, we can install the file using the dpkg command:
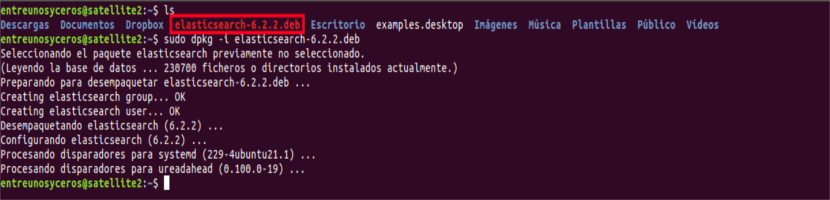
sudo dpkg -i elasticsearch-1.7.2.deb
The configuration files for ElasticSearch will be stored in the path / etc / elasticsearch. To make sure it starts and stops with the machine, run the following command:
sudo update-rc.d elasticsearch defaults
Setting up ElasticSearch
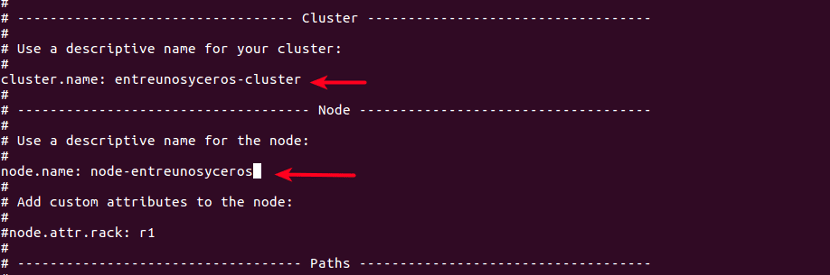
At this point we already have an active Elasticsearch installation. To use it effectively, we can make some major changes to the settings. Run the following command to open configuration file correspondent:
sudo nano /etc/elasticsearch/elasticsearch.yml
In the file we will modify node.name and cluster.name in the elasticsearch.yml file. Remember to remove the # before each line that we want to edit to unmark it as a comment.
Once we finish the modifications we will save the files and return to the terminal. Now is the time to start ElasticSearch server for the first time. For this we write in the terminal:
sudo service elasticsearch start
When the server is already started we will verify the status of the service typing in the terminal:

Using ElasticSearch
Now that ElasticSearch has started working on our computer, we can start using it. For view instance details and cluster information, run the following command:
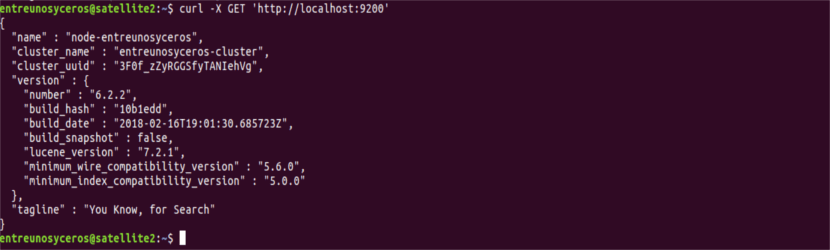
curl -X GET 'http://localhost:9200'
You may have to install curl. To do so, use the following command:
sudo apt install curl
Now, we can try insert some data into ElasticSearch using the following command:
curl -X POST 'http://localhost:9200/entreunosyceros/hola/1' -H 'Content-Type: application/json' -d '{ "name" : "entreunosyceros" }'
When we run this command, we get the following output:

Inserted data, we are going to test get the ones we just insertedr:
curl -X GET 'http://localhost:9200/entreunosyceros/hola/1'
When we run this command, we get the following output:

In this post I'm just trying to show how we can install ElasticSearch and run basic queries on it, but it has a lot more possibilities that we can discover on our own or in the official documentation.