In the next article we are going to take a look at how can we install Zenmap on Ubuntu 20.04. This is the official GUI for Nmap Security Scanner. It is a free and open source cross-platform application that aims to make Nmap easier for beginners to use, while also offering some advanced features for experienced Nmap users.
As I said, Zenmap is a graphical user interface developed for “Nmap", which as many users know is a tool used from the command line terminal, with which ports and networks can be scanned. However, it can get cumbersome for even the most experienced users to use the command line for every little task.
For those who do not have much idea of what Nmap is, tell them that is a tool that is generally used in network security to scan open ports of a computer on the network. In addition, this software has several functions to probe computer networks, including detection of equipment, services and operating systems. These functions are extensible through the use of scripts to provide advanced detection services, vulnerability detection and other applications.
The Network Mapper or Nmap is particularly suitable for finding all active hosts in the network environment (ping sweeps), as well as your operating system (OS fingerprints) and the version numbers of various installed services.
In short, the only key difference between Zenmap and Nmap is the GUI. Nmap is a command line tool, which to use it graphically has an interface called Zenmap.
Install ZenMap on Ubuntu 20.04
How to Live Aligned with Zenmap is no longer available in Ubuntu repositories, we have to manually download and install the package on our system. But before we start, let's update the packages available from the repositories using the following command in the terminal (Ctrl + Alt + T):
sudo apt update
It has to be said that When installing Zenamp on our system, we will see that Nmap comes with the package, in case you are one of those who prefers to use this program from the terminal.
Install Python GTK2
Zenmap will use Python GTK2 to create the graphical user interface. For this reason we will also have to install it on our Ubuntu 20.04 system before proceeding further. To do this, first we are going to download it using wget as follows in the terminal (Ctrl + Alt + T):

wget http://archive.ubuntu.com/ubuntu/pool/universe/p/pygtk/python-gtk2_2.24.0-5.1ubuntu2_amd64.deb
Once the download is finished, we can proceed to installation writing in the same terminal the following:
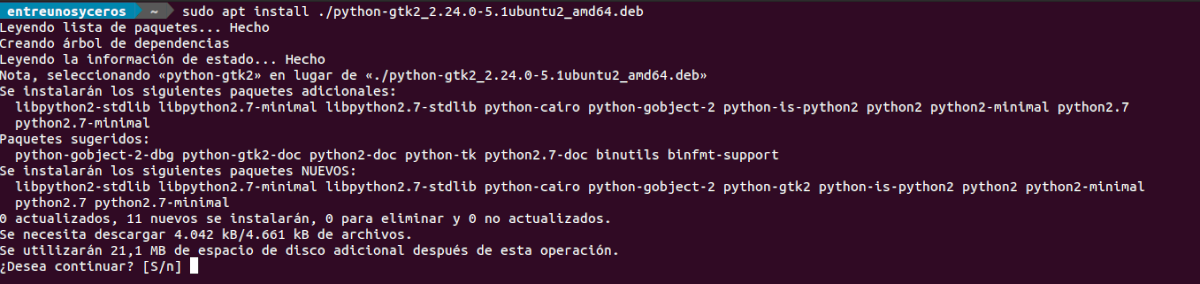
sudo apt install ./python-gtk2_2.24.0-5.1ubuntu2_amd64.deb
Download and install the Zenmap .deb package
The Debian package currently available, without having to resort to alien, for installation it is zenmap 7.6. We will be able to download this using wget in the terminal (Ctrl + Alt + T) as follows:

wget http://archive.ubuntu.com/ubuntu/pool/universe/n/nmap/zenmap_7.60-1ubuntu5_all.deb
Once the download is finished, we can proceed to installation with the following command:
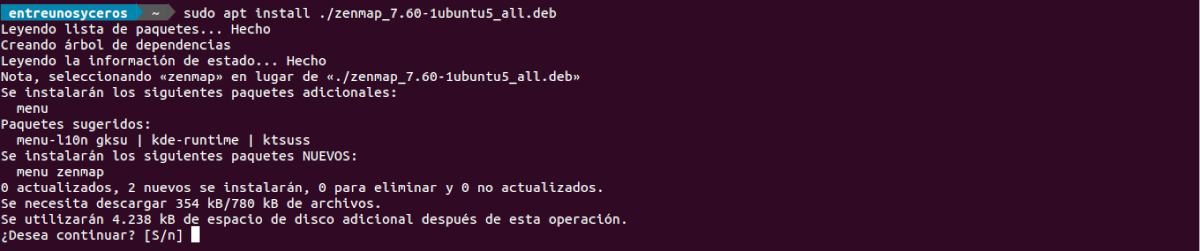
sudo apt install ./zenmap_7.60-1ubuntu5_all.deb
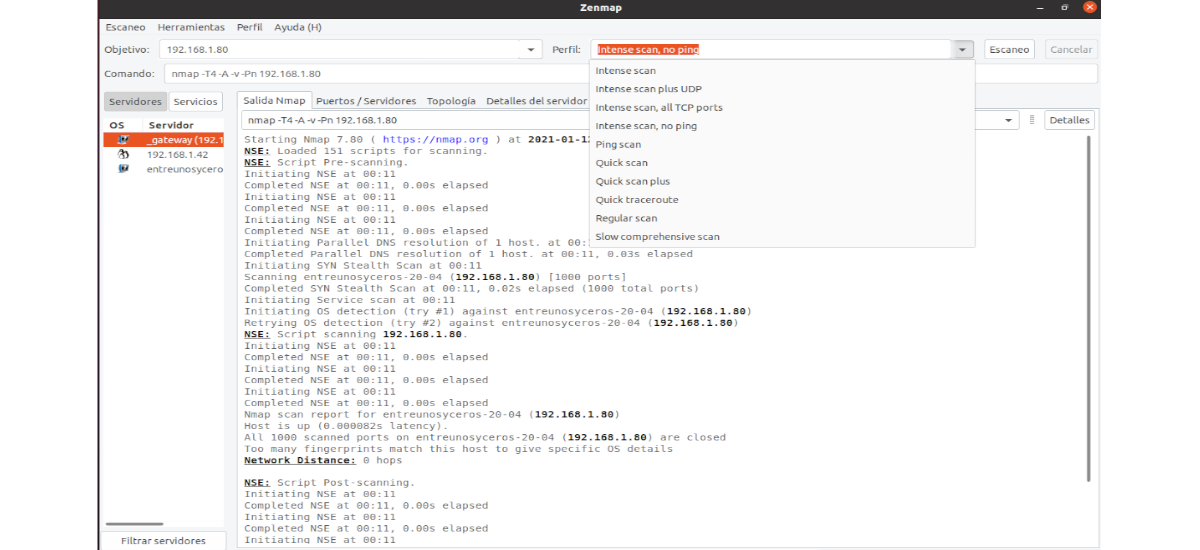
Run Zenmap

To access all functions, we will have to run Zenmap as root user. We can run this program as root by searching for the corresponding program launcher or by opening a terminal (Ctrl + Alt + T) and executing the command in it:

sudo zenmap
With this we can now use Zenmap in our Ubuntu 20.04 LTS. For a network scan, we will only have to type the IP address or the host name. From the drop-down box, users will be able to choose between several types of analysis such as; full scan, simple scan, or ping scan to verify the availability of a computer. In the Nmap output window on the right hand side, it will be where we can see the individual steps in Nmap.
uninstall
For remove Zenmap We will only have to open a terminal (Ctrl + Alt + T) and execute the following commands:

sudo apt remove zenmap; sudo apt autoremove
For detailed information on how we can use Zenmap, users can consult the official documentation that they offer on the nmap website.