
Hello everyone. Today we are going to do a tutorial on how to automatically mount drives in our Ubuntu.
Drives, mount .... Doesn't my Ubuntu already do that?
According to official announcements, Ubuntu mounts any drive automatically, that is, you plug in a usb or sd card and it automatically recognizes it and you can use it and handle it as you please, which vulgarly amounts to the mounting process. But there are times and with unique devices that Ubuntu does not recognize them, well Ubuntu and almost all Gnu / Linux distributions, that is why there are these techniques that are based on personally telling the computer that such connection read it and activate it for your use . We will also try to modify a file so that when you start the computer this device will load you and you will not have any more problems, because there are times when we turn on the computer to pass or view files from a unit such as a USB or a portable hard drive.
And this to mount units, is it difficult?
The answer is no, but as always, read the entire tutorial before doing anything and then make sure you have a backup of your system o make a restore pointAfter all this we go to the terminal and execute:
sudo blkid
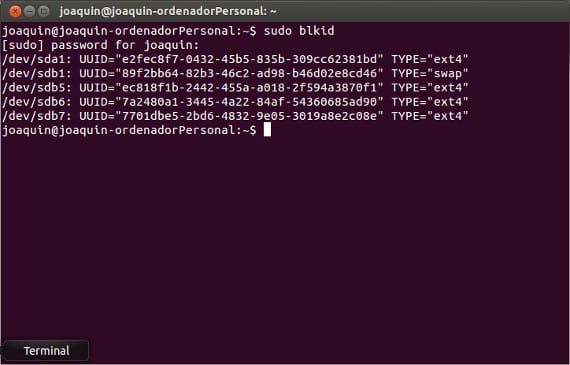
This command shows us on the screen a summary of our partition table, which includes all the storage systems that work and those that do not, once the partition to mount is identified, / dev / sdaX, we take the value of UUID and the physical address of the unit, / dev / sda "X" and we write in the console
sudo mkdir / media / disk_sd
This creates a folder inside the / media folder where we will mount the new drive or drives. Now, finally, we are going to add the following line to the / etc / fstab file:
<span style="font-family: 'Times New Roman', serif;"><span style="text-decoration: underline;"><b>sudo echo "/dev/sda</b></span></span>
<span style="font-family: 'Times New Roman', serif;"><span style="text-decoration: underline;"><b>7</b></span></span>
<span style="font-family: 'Times New Roman', serif;"><span style="text-decoration: underline;"><b> /media/</b></span></span>
<span style="font-family: 'Times New Roman', serif;"><span style="text-decoration: underline;"><b>disco_sd</b></span></span>
<span style="font-family: 'Times New Roman', serif;"><span style="text-decoration: underline;"><b> ntfs-3g auto,rw,users,umask=000 0 0" >> /etc/fstab</b></span></span>
In my case, I have chosen the / dev / sda7 partition, the / media / disk_sd mount directory, the ntfs-3g partition type, the options of the mount command that we have chosen and what they mean are:
- auto -> automatic assembly
- rw -> read / write mode
- users -> Allows it to be mounted by users other than root
- umask -> mask required when modifying files
Attention!
Do not forget to put the last two zeros since they are so that it does not back up data and to avoid reviewing the disk, respectively. It is a simple tutorial and still necessary today, since there are elements such as the Kindle ebook reader that has difficulties in reading and mounting units seems to be the only solution. By the way, I forgot to tell you that it is necessary to have the device we want to mount connected, otherwise it does not appear in the blkid indications.
More information - Automated copies in Ubuntu 13.04, SystemBack, another useful backup tool,
Source - EncodingTheCode
Hello, Thanks for the good content of the Blog. 2 days ago I just installed Ubuntu 14.04LTS Amd64 and the console returns this to me
»Bash: / etc / fstab: Permission denied»
How is it solved?
regards
$ sudo su
# echo «/ dev / sda7 / media / disk_sd ntfs-3g auto, rw, users, umask = 000 0 0» >> / etc / fstab
I removed the usb cable the other day without disassembling the hard drive and now it does not read it to me. What you mention is also applicable to this I suppose, that is, mounting units that they have stopped recognizing? Thanks in advance
Better to do a script on startup.
If you do it like this, the day that the pendrive is not inserted it will not start the machine
To solve this problem, just do the following:
1.-We enter our Terminal as root. if you don't know, it's like this:
sudo -s
and type your pass.
2.-already inside as root we put this line
ubuntu ~ $: nano / etc / initramfs-tools / modules
3.-a txt type will open in which we will put down.
ide_generic, ide_cd and ide_generic <- like this without a line break.
4.-we give ctrl + x - We save the changes.
5.-we return to the terminal again and type:
ubuntu ~ $: update-initramfs -u
6.- We wait for it to load and within the same terminal we reboot or close and restart your system.
7.-Restarting will take a while but don't worry it's normal and Wualaaa solves the problem like this :).
Doubts Problems? Post them, I will help you;)
Hello, I have a partition dev / sda2 in Ubuntu 19.10 that I can't mount it, I have tried in several ways and there is no way ...
Could you explain to me how you would do it? and something more detailed, in this tutorial I get lost a bit (as you can see I am not very expert ...)
Hello
The html style is appearing in the lines of code and it may cause problems for those who follow this tutorial.